Thursday, March 29, 2012

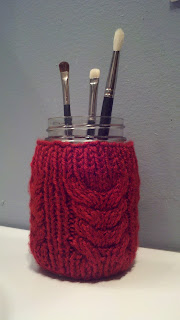
From the Vanity: Makeup Brush Holder

I love playing around with my makeup, and as such I've started collecting a few makeup brushes. I had just been letting them lay there on the sink, but then my cat, Atari, found that they were a great play toy. I realized that I needed somewhere else to put them, and decided that I might as well find a cute way while I was at it. So, I decided to use a jar I had lying around and knit a cover for it. I really liked the way it turned out, and thought I'd share the pattern with you! I hope you enjoy it!

We're moving!  See the pattern here: Makeup Brush Holder

Wednesday, March 28, 2012

From the Vanity: Essie Ballet Slippers

I recently picked up a new nail polish that I'm absolutely in love with.  The polish is Essie's Ballet Slippers, and it is the most beautiful shade of marshmallow pink, the perfect pastel color for Spring, especially as we get closer to the Easter season.

As much as I love the color of this polish, I do have one complaint.  The formula is slightly watery, so it takes a few coats to make it opaque, but that's something I've come to expect from Essie polishes.

Even so, I would definitely recommend this polish.  Once built up, the color is gorgeous, and even the bottles are very pretty and feminine.  It's a color that I think just about anyone can pull off, simply because it is such a neutral color.

Friday, March 23, 2012

Jewelry Box: Twig Companion Rings

A couple days ago, I put up a post on how to make a Bird's Nest Ring, which is the ring with the 'egg' in the center which you can see in the picture on the right.  I absolutely loved making those rings, but after making 24 of them, I ran out of beads.

However, I still had a bit of wire left over, and didn't really want it to go to waste.  Sure, I could have gone out and bought more beads, but I instead decided to design a new ring, which would just use the wire, and be a companion ring to the Bird's Nest Ring.  That was how the Twig Companion Rings were born, which are the two stacked rings you can also see in the picture.

I love how they look together, and if you're interested in making these little rings, as well, keep on reading!  I've included the instructions below!

Materials

  • a few inches of 22 gauge wire (about half the length from your fingertips to your elbow)
  • Round nose pliers
  • Wire cutter
  • A wooden dowel or other object the same size as you'd like your ring to be
Instructions
  • Wrap the length of wire around the wooden dowel or other object (I used the top of a Bath & Body Works travel hand sanitizer bottle) twice, keeping the ends about the same length.
  • Keeping the size of the ring stable, slip the ring off the dowel.
  • Grab one tail, and wrap it around both strands of wire a few times, then take the other tail and do the same thing.
  • Cut off any excess wire, and use the pliers to make sure there are no sharp ends.
  • Finally, twist the ring band slightly until it creates a slight spiral between the two strands, and continue twisting around the ring to bind the two strands together.
  • There you have it!  A nice, easy way to make a companion for your  Bird's Nest Ring, or any other ring you'd like to pair it with!

Thursday, March 22, 2012

Out on the Town: Duct Tape Wallet

2012-03-22_14-37-59_899.jpg 
I had made a duct tape wallet at the beginning of the school year, thinking that it would be a great craft for the middle school kids I was working with after school.  The craft ended up being a hit, and they actually had to do it again later in the school year!  I began using the wallet I had made soon after that, and got a number of compliments on it, and was actually asked to make other people these duct tape wallets as well.

I've been using this same duct tape wallet since then, and it only recently started falling apart.  While it is fairly easy to repair these wallets just by adding a little more duct tape to them, I decided that it was time for a change, especially in the color department (my old one was bright turquoise and pink - not really my style!).  I was talking to Cornelius about this a little, right after we'd gotten done talking about how I thought this blog might end up being more of a crafts blog than anything, and he suggested that I explain how to make these to you guys, as well.  I thought it was a great idea, so here it is!  If you're interested in making a duct tape wallet of your own, read on!

Materials
  • 1 roll of duct tape - I used a red Duck brand duct tape, but they come in all sorts of colors!
  • a pair of scissors
  • 1 piece of notebook paper
2012-03-22_12-49-18_164.jpg 

Instructions
  • Cut the top margin off the piece of notebook paper, and on a clean, flat surface, begin covering the piece of paper with duct tape.
2012-03-22_12-53-53_617.jpg
  • Once the paper is completely covered on one side, trim the excess duct tape off the paper, and flip the work over.  
  • Repeat the first two steps for this side, as well.
  • Take a piece of duct tape just longer than the longest side of the wallet, and rip this down the center.  Now, rip it again, so you have a long strip 1/4 of the width of the duct tape itself.
  • Fold this over the top and bottom sides of the wallet to finish those sides.  Cut off any excess.
2012-03-22_13-14-20_895.jpg 
  • Fold the entire wallet in half lengthwise, and take another 1/4 width piece of duct tape to line the bottom of the wallet.
  • Before we seal the sides of the wallet, we will want to make pockets.  To do this, take a long piece of duct tape, and fold this in half.  
2012-03-22_13-25-34_766.jpg 
  • Then, fold the wallet in half width-wise to determine how big the pockets should be.  Cut strips from the duct tape you folded in half to make the pockets (6 is usually a good number of pockets)
  • Taking 1/4 width pieces of duct tape, line the tops of the pockets as we did for the wallet sides.
  • Now, we will attach the pockets to the wallet.  Taking 1/4 width pieces of duct tape, again, tape the pockets down by placing a piece of tape along the bottom edge.
2012-03-22_13-36-03_515.jpg 
  • Once the pockets are in place, we can begin sealing it up.  Take 2 pieces of 1/4 width duct tape, and seal up the sides, thereby sealing the pockets, as well.  Cut off any excess.
 
  • Finally, take a 1/2 width strip of duct tape, and put it right down the center to completely seal the pockets.  That's it!  You've made a duct tape wallet!
Tip:  To get the wallet to hold its shape, stick it under something heavy for a little while.  This will set the inner crease more, and help it stay shut!

Wednesday, March 21, 2012

Jewelry Box: Bird's Nest Ring

I was lying in bed last night, thinking about rings my mother and I used to make out of buttons and wire, and thought that there must be a way to upgrade this quick little craft to create a more fashionable item.  That was when I decided that there must be a way I could use beads, instead.  So, I headed to my local craft store, and picked up some Swarovski beads and 22 gauge wire to see what I could come up with.

The result was a cute, dainty little ring that looked a bit like a bird's nest with a little colored egg in the center.  After a few tries, I found that it was quite easy to make, and really quite cost efficient.  I was able to make over 24 rings with just one wire package, and all that's necessary is the wire and a few small beads!  I hope you like it as much as I do, and just in case you'd like your own, you can follow the instructions I've included below!

Materials
  • a few inches of 22 gauge gold wire (about the length from your fingertips to your elbow)
  • 6 mm round faceted bead
  • Round nose pliers
  • Wire cutters
  • A wooden dowel or other object the same size as you'd like your ring to be
Instructions
  • Wrap the length of wire around the wooden dowel or other object (I used the top of a Bath & Body Works travel hand sanitizer bottle) twice, keeping the ends about the same length. 
  • Keeping the size of the ring stable, slip the ring off the dowel.
  • Slip the 6mm bead onto one of the ends, then tuck this same end through the ring opening to secure the tail.
  • Grabbing both tails now, wind them around the bead to secure it to the ring, creating a bird's nest effect.
  • Cut any excess wire, and make sure there are no sharp ends.
  • Finally, twist the ring band slightly directly opposite from the bead until it creates a slight spiral between the two strands of wire.  Continue twisting on both sides of the ring to bind the two strands together.
  • There you have it!  A quick, easy, dainty bird's nest ring!

Sunday, March 18, 2012

Crafting Corner: Cute & Cozy Legwarmers

This winter, on a weekend trip to the cities, I got a wild idea that I wanted to make a pair of legwarmers.  In a way, it made sense, considering how easily I get cold.  Plus, I thought they'd just look kind of cool with my favorite pair of Steve Madden boots!  I was pleasantly surprised with how they turned out, and how easy they were to make.  They looked just like those long, sweater-socks I've seen people wearing (thanks to the cabling), but since they don't have feet, you don't have to worry about over-crowding when you wear them with shoes!  As with my other patterns, I hope you enjoy it, but please do not use it for profit.  Thank you!


Materials
  • 1 skein Caron Simply Soft - Bone
  • 2 U.S. 8 Circular Needles
  • Stitch Marker
  • Cable Needle
  • Tapestry Needle


Stitch Glossary
    CB4: Sl 2 sts to cn and hold to back, k2, then k2 from cn.
    CF4: Sl 2 sts to cn and hold to front, k2, then k2 from cn.
Instructions
    Cast on 68 sts.(34 sts per needle)
    Rounds 1-10: Work k1, p1 ribbing around, marking beginning of round with marker.
    Rounds 11-12 (and all even numbered rows unless stated otherwise): [(p1,k1) twice, p1, k12] around.
    Round 13: [(p1, k1) twice, p1, CF4, CF4, CF4] around.
    Round 15: [(p1, k1) twice, p1, k2, CF4, CF4, k2] around.
    Round 17: Repeat round 13.
    Round 19: [(p1, k1) twice, p1, CB4, CB4, CB4] around.
    Round 21: [(p1, k1) twice, p1, k2, CB4, CB4, k2] around.
    Round 23: Repeat round 19.
    Repeat rounds 12-23 5 more times, or until desired length is reached. Then, repeat rounds 1-9, and cast off ribwise.
Finishing
    Weave in tails with tapestry needle, and remove marker. You now have a legwarmer! Just go back and do the same thing for the second!

Saturday, March 17, 2012

Show & Tell: Influenster's Love VoxBox


A while ago I signed up for Influenster, and last week, you may have seen that I added a new video to my Youtube channel showing off my first Influenster VoxBox.

Unfortunately, the day after I received the box, I went on vacation, and couldn't really try out the products!  So, I've finally gotten around to reviewing the items, and wanted to quick share my results with you...Read More›

Friday, March 16, 2012

From the Vanity: Spring Polish Picks


It's finally starting to feel like Spring outside, and since I just added a new 'Beauty' tab to my blog, I thought it'd be fun to let you know what I'll be wearing on my nails this Spring!  The polishes I've chosen are, as you can see, all from Essie, which is one of my favorite brands.  These polishes are available so many places, like Walmart and Target, for about $8.00...Read More›

Thursday, March 15, 2012

Crafting Corner: Sweater a Month Series

We just got back from our trip to Florida last night, and although I do plan on putting up a couple more posts about the trip, I didn't really feel like doing anything that evening.  So, I took out my knitting again.

I announced on my Youtube channel last week that I would be starting a 'Sweater a Month' series, where I would pick a free online sweater pattern that we could all knit together.  Naturally, you wouldn't have to do every single sweater, nor would you have to even knit it.  The goal is more so to provide a community for people who like crafts like this, and share what we've come up with.  I'll certainly be trying to put my own spin on the garments I've created, and I encourage you to do the same!

So, I've started my second sweater of the series, my April sweater.  The pattern I've chosen is one written by Mary Weaver, called the Dahlia sweater, which can be found here.  It's a beautiful empire-style sweater with a Victorian spin.  She uses a violet yarn from Cascade Yarns, which I think is so pretty - in fact, I can already tell you that I'm doing mine in a very similar color.

I'd love for you to work on this sweater with me, and don't worry about completing it in a month!  Take your time, it's supposed to be fun!  If you'd like to see March's sweater, check out the video below.  Also, do you have a better name for this 'Sweater a Month' series?  I'm not completely sold on it.  Please leave your suggestions in the comment section below!
  

Wednesday, March 14, 2012

From the Vanity: Kiss Nail Dress

Just before I went on my vacation to Florida, I received a pack of 28 Kiss Nail Dress stickers to try out and review.  I was a bit hesitant about them at first, since I typically like to keep my nails pretty simple, usually sticking to one color.  However, as you can see by the picture I've included, these stickers are anything but plain!

We're in the process of moving!  For the full review, click here: Kiss Nail Dress

Saturday, March 10, 2012

Leaving on a Jetplane: Disney's Hollywood Studios

Yesterday, we headed over to Disney's Hollywood Studios which was, for the most part, much more relaxed than the day before, but it certainly didn't start out that way.
Cornelius only brought two pairs of shoes along for the entire week, which would have been fine had they not been a pair of dress shoes and a pair of flip-flops.  So, right away in the morning, the two of us headed over to Downtown Disney to look for a pair of tennis shoes while the rest of my family headed over to the park.

Better Than Sliced Bread: Wikipedia Game

On the way down to Florida, I got extremely bored, and was tired on the games I had already downloaded onto my phone, so I decided to come up with a new game.  The result was my Wikipedia game, which is surprisingly entertaining, takes up very little space, and is even educational!

I have a Wikipedia app on my phone already, to indulge my need for occasional nerdiness, so you could either download this app or simply head over to the original Wikipedia.  Then, think of a random item, such as an aardvark, tire, parasol, etc., and at the same time, bring up a random article.

Now, try and use the links on your random article to get to your random item.  It may take a few steps, but I've been able to reach all my goals, which has included going from a Belgian sculptor to a cat, and from a tire to an aardvark.  It's certainly kept me busy while waiting in lines for the rides here in Disney World!

Friday, March 9, 2012

Leaving on a Jetplane: Magic Kingdom

Well, well, well. Lucky you! You get more than one post a day today! Although I did prewrite a couple posts for you, I decided that I wanted to give a couple little updates on how our trip is going so far- not just for you but for me as well. I didn't bring much of a travel journal, so I thought an online journal would be a good substitute.

Crafting Corner: Carrie & Claus Keychain Pattern

At first, I was a bit hesitant to share any of the Carrie & Claus patterns with you guys, since I had thoughts of selling some of the goods that I  made - which would include some of the patterns.  However, I was in a good mood tonight, and decided that I would share the pattern for one of my most-used Carrie & Claus items, my keychain.  It is made up very, very quickly in Dark Sage from Caron Simply Soft.  I hope you enjoy this pattern, but please do not use it for profit.  Thank you.

Thursday, March 8, 2012

Life is Like Coffee

While I'm enjoying being at the "Happiest Place on Earth", I thought you all might enjoy a post that was on my good friend Michelle's blog this past week.  I definitely recommend checking out her blog, Loving Life in the Grind - she has a lot of great inspirational Christian posts.

One of her posts that I especially enjoyed was entitled Life is Like Coffee, which provides a link to a video comparing our lives to that of coffee.  I know initially that sounds odd, but you really do have to see the video to understand exactly what that means.  So, click on the coffee cup above to see the video, or stop by Michelle's blog!


Wednesday, March 7, 2012

Leaving on a Jet Plane: Flying to Florida

I might have forgotten to mention something fairly exciting to you guys.  I, along with my parents, brother, and boyfriend, am taking a little vacation this week, and heading to Orlando, Florida.  We will be hanging out in Walt Disney World, where we will be staying in one of the cabins at the Wilderness Campground on the Disney property.

I'm really excited about the trip, and I'll try and update you on how the trip is going as the week progresses, but please don't feel offended if I wait until I get home and give you a nice, long post about what all we did.  I may be having too much fun and be far too tired to write much.

In the meantime, please take a look at the new look to the blog.  I finally got started on my Carrie and Claus reformatting!  I have ideas on how I want to do the rest of it, but I think I'll need a little bit more content and possibly even a little more drive to keep up on this blog before I can put some of that up.  Please be patient, and hopefully we'll have a nice little blog soon enough.  Have a good week!

Tuesday, March 6, 2012

What's the Band in My Head Playing? Billy Joel

Last week, I really had no inspiration to write.  I'm not entirely sure what it was, but I just had no interest, and I don't see the point of forcing myself to do anything.  But, I have a couple posts in mind now, including a few new Youtube videos that I think will be a little better than the previous ones have been.  I'm getting a little more comfortable being in front of the camera, so all we have left is to try and not be so scatterbrained!